Polymer Clay Earrings
Here is a detailed, friendly, and encouraging DIY tutorial for making your own polymer clay earrings.
—
### Craft Your Own Story: A Beginner’s Guide to Polymer Clay Earrings
Hello, lovely crafter! Are you ready to dip your toes into the wonderfully squishy world of polymer clay? If you’re looking for a hobby that’s relaxing, rewarding, and produces gorgeous, wearable art, you’ve found it. Making your own earrings is one of the most satisfying projects to start with. You don’t need a kiln or a pottery wheel, just a bit of patience, a sprinkle of creativity, and a desire to have fun. The best part? You get to design jewelry that perfectly matches your style, and no one else on the planet will have the exact same pair.
So, put on your favorite playlist, clear off your kitchen table, and let’s get our hands dirty (well, a little cleanly dirty). We’re going to make a pair of beautiful, modern, minimalist earrings that are perfect for beginners. This project is all about learning the basics of conditioning, shaping, and baking—the three pillars of polymer clay success.
### Your Crafting Toolkit: Materials List
Before we begin our clay adventure, let’s gather our supplies. You don’t need to buy the most expensive tools right away. In fact, you can find most of these items at your local craft store or even around the house.
**The Essentials:**
– **Polymer Clay (2 colors):** This is our star ingredient. For beginners, I recommend a brand like Sculpey Premo or Fimo Professional. They are firm enough to hold their shape but soften easily when worked. Pick a main color (like a soft blush pink or terracotta) and a contrasting accent color (like white or gold). You can buy small blocks of each.
– **A Clean Work Surface:** A ceramic tile, a piece of glass, or a large plastic cutting board works perfectly. **Crucial tip:** Do *not* work directly on your wooden kitchen table. Polymer clay can stain wood, and the wood’s oils can affect the clay.
– **An Acrylic Roller or Rolling Pin:** You can get a dedicated clay roller, or use a smooth glass bottle or a jar. The goal is to roll out perfectly even sheets of clay.
– **A Craft Knife or Clay Blade:** A sharp, straight blade is essential for cutting clean shapes. A tissue blade is a favorite among clay artists for its flexibility, but a sturdy craft knife will do the trick perfectly.
– **Earring Findings:** This includes the posts or hooks that go through your ears. For beginners, simple fishhook ear wires (for pierced ears) or clip-on backs are easiest. You’ll also need small “headpins” (thin wires with a flat head) to connect the clay piece to the earring hook.
– **Jump Rings:** These are tiny metal rings used to connect the headpin to the earring hook.
– **Jewelry Pliers:** Two pairs are ideal—one for bending wire and one for opening and closing jump rings. Don’t worry if you only have one pair; you can make do, but two makes it much easier.
**The “Nice-to-Have” Extras:**
– **An Oven Thermometer:** This is a game-changer. Home ovens are often inaccurate, and polymer clay needs a specific temperature to cure properly and not burn. This cheap tool will save your clay.
– **A Pasta Machine:** If you fall in love with this hobby, this dedicated clay tool is a lifesaver for rolling perfectly even sheets of clay. But don’t feel pressured to get one now!
– **A Metal Clay Cutter (in a shape you like):** You can buy cookie-cutter-like shapes for clay, but for our project, we’ll be using our knife to cut freehand shapes.
– **A Toothpick or Needle Tool:** Perfect for making holes for the jump rings.
– **Baking Parchment Paper:** To protect your baking sheet.
—
### Let’s Get Crafting: Step-by-Step Instructions
**Project: The “Terrazzo Dream” Earrings**
We’ll be making a pair of drop earrings with a terrazzo-style pattern, which is all about little chips of color set in a solid background. It’s forgiving, stylish, and looks way more complicated than it is.
**Step 1: Condition Your Clay (The Warm-Up)**
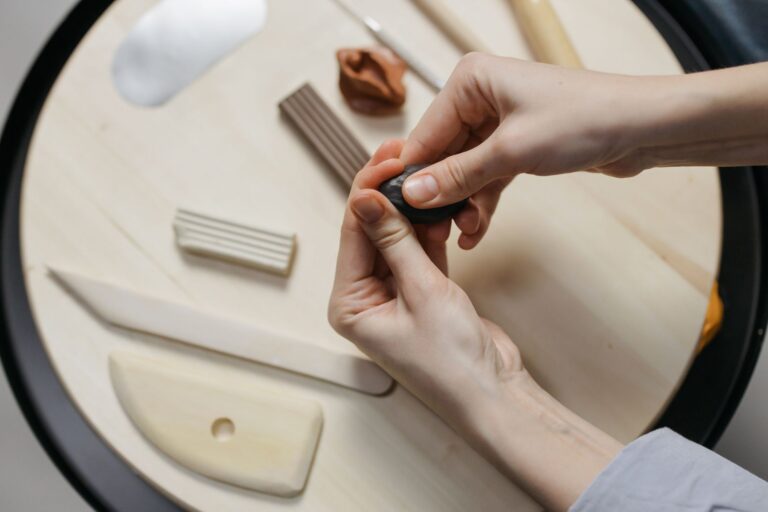
This is non-negotiable. Polymer clay is made of PVC particles and plasticizers, and you need to warm it up to make them pliable and eliminate air bubbles. Take your main color clay and break it into a few pieces. Roll it into a ball in your hands, then squish it flat. Roll it into a snake, then fold it in half and squish it flat again. Repeat this process for a few minutes until the clay is soft, smooth, and pliable, like warm taffy. Do the same with your accent color.
**Step 2: Create the Terrazzo Chips**
Take a small amount of your accent clay (and maybe a third color if you have one) and roll it into a thin snake. Cut the snake into tiny, irregular pieces—these are your “chips.” They can be as small as a sesame seed or as large as a peppercorn. Don’t overthink it; irregularity is what makes the terrazzo look organic and beautiful. Set these aside.
**Step 3: Roll and Assemble**
Roll your main color clay into a smooth ball. Using your acrylic roller, roll it out into a flat sheet, about 2-3 millimeters thick. Try to keep it as even as possible.
Now, sprinkle your little terrazzo chips onto the sheet of clay. Gently press them into the surface with your fingers. Then, take your roller and lightly roll over the top again to press the chips flush and create a smooth, flat surface. Don’t roll too hard, or the chips will smear.
**Step 4: Cut Your Shapes**
Now, look at your clay sheet. We’re going to cut two simple, elegant shapes. Using your craft knife, cut out two long, rounded rectangles (or any shape you love—teardrops, simple circles, or even a classic triangle). Place your knife at an angle for a slight beveled edge. Don’t worry if the edges aren’t perfect; you can smooth them with your finger. Aim for both pieces to be roughly the same size and shape. If you have a shape cutter, you can use that for perfect symmetry.
**Step 5: Create the Holes**
Before baking, you *must* create the holes for your earring findings. Do this now, while the clay is soft! Take your toothpick or needle tool and poke a hole near the top of each earring piece. Twist the toothpick gently as you push it through to make a clean hole. Make sure the hole is large enough for your jump ring to fit through later. If the hole gets squished while baking, you can re-drill it with your needle tool while the clay is still warm.
**Step 6: Bake Your Art**
Preheat your oven to the temperature specified on your clay’s packaging (usually 230°F or 275°F). **Crucial:** Put your oven thermometer inside to verify the temperature. Place your earrings on a baking sheet lined with parchment paper. Bake them for the recommended time (usually 15-30 minutes, depending on thickness). Keep an eye on them! They might have a slight “waxy” smell, which is normal. **Warning:** If they start to brown or smoke, turn off the oven immediately. Your clay is burning.
**Step 7: Cool and Finish**
Once the timer goes off, remove the baking sheet and let the earrings cool completely on the sheet. This is important—they are soft and pliable when hot and will hold their shape much better if left to cool undisturbed. After they are completely cool to the touch, they will be hard and durable.
**Step 8: Assemble the Jewelry**
This is where your earrings come to life!
1. Take a headpin and slide it through the hole in your earring piece. The flat head of the pin should be on the back side of the clay.
2. Using your pliers, bend the top of the headpin at a 90-degree angle.
3. Trim the excess wire with your pliers, leaving about a 1/4 inch tail.
4. Using your pliers, curl this tail into a small loop.
5. Now, take a jump ring. Open it by twisting the ends away from each other (don’t pull them apart, that weakens the metal).
6. Slide the jump ring through the loop you just made on the headpin and through the loop on your earring hook.
7. Close the jump ring by twisting the ends back together. Repeat for the other earring.
Stand back and admire your work! You just made a beautiful, custom pair of earrings.
—
### Tips for the Beautiful Beginner
– **Clean Hands, Happy Clay:** Wash your hands thoroughly before you start. Lotion, makeup, and dirt can affect the clay’s surface and leave fingerprints.
– **The “Fingerprint” Test:** If you press a fingerprint into the clay and it disappears after a few seconds, it’s ready to use. If it stays, keep conditioning.
– **Perfection is Overrated:** Embrace the imperfections! The little wobbles and quirks in handmade items are what make them special. Your earrings are unique pieces of art.
– **Invest in an Oven Thermometer:** I cannot stress this enough. It’s the number one way to prevent burnt, ruined clay.
– **Don’t Be Afraid to Re-roll:** If you don’t like how your shape looks, just squish it back into a ball and start again. Clay is endlessly forgiving; you can’t make a mistake you can’t undo.
—
### A Fun Variation: The “Speckled Stone” Effect
Once you’ve mastered the basics, try this gorgeous variation. Instead of terrazzo chips, use a toothbrush to create a delicate speckle pattern.
1. Roll out your base clay as before.
2. Take a small ball of a contrasting clay and roll it into a thin snake.
3. Dip an old toothbrush in water, shake off the excess, and then rub the wet bristles over the clay snake. The water and